How to Regrout Tiles and Make Them Look Brand New
Are your tiled surfaces starting to look dingy, cracked, or just plain worn out? Before you consider a costly replacement, there’s a much simpler solution—regrouting. Whether it’s your kitchen backsplash, bathroom floor, or shower wall, regrouting can breathe new life into tired-looking tile and give your space a fresh, clean finish.
The best part? You can do it yourself with a few tools, a little patience, and this step-by-step guide.
Why Regrout Instead of Replace?
Grout isn’t just cosmetic—it keeps moisture out and tiles in place. But over time, it can crack, discolor, or wear away. Regrouting removes the old, damaged material and replaces it with fresh grout, restoring your surface’s look and durability without removing the tiles.
Step 1: Prep Your Workspace
Start by inspecting the tiles and grout. Look for loose tiles, crumbling grout, or signs of mold. If tiles are damaged or shifting, fix them before you begin regrouting.
Gather Your Tools:
-
Grout saw or rotary multitool
-
Grout float
-
Bucket and sponge
-
Rubber gloves and safety glasses
-
New grout (sanded or unsanded depending on joint width)
-
Grout sealer
-
Drop cloths and painter’s tape
Protect Surrounding Surfaces:
Cover floors, countertops, or nearby fixtures with plastic sheets. Mask off edges to keep everything neat.
Step 2: Remove the Old Grout
Use a grout saw or oscillating tool to carefully remove the top layer of old grout between the tiles—at least 1/8 inch deep. Take your time and avoid scratching the tiles. Once done, vacuum or brush out the gaps thoroughly.
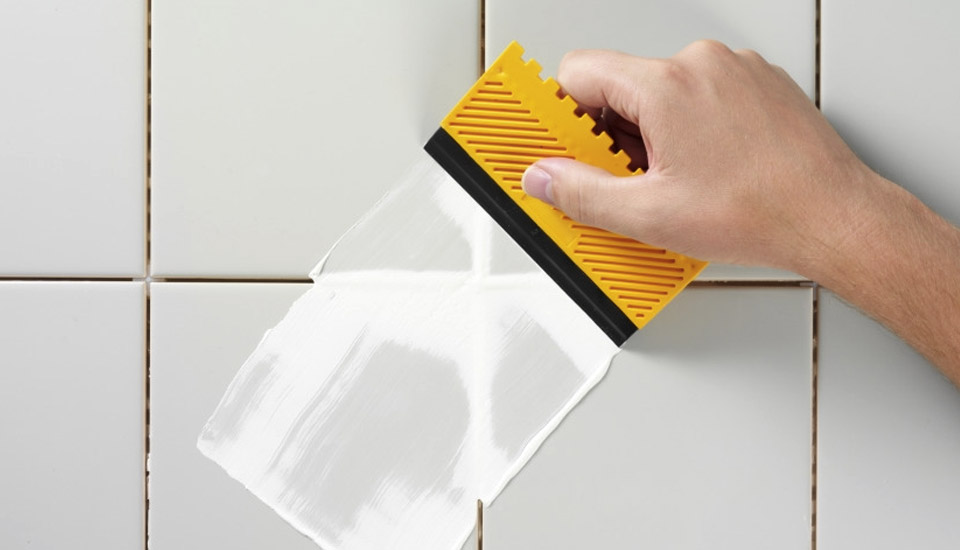
Step 3: Mix and Apply New Grout
Follow the manufacturer’s instructions when mixing your grout—it should be thick and smooth, like toothpaste.
Using a rubber float, press the grout into the joints at a 45-degree angle. Work diagonally across the tiles to ensure every gap is filled. Then, scrape off the excess with the edge of your float.
After 15–30 minutes, gently wipe the tiles with a damp sponge to remove haze, rinsing often.
Step 4: Let It Cure and Seal
Let the grout cure for 24–48 hours (check the product label for specific timing). Once dry, buff away any haze with a soft cloth.
To protect your work, apply a grout sealer. This step helps prevent stains, mold, and moisture damage over time.
Regrouting Checklist
✅ Assess tile and grout condition
✅ Remove old grout
✅ Clean out joints
✅ Mix and apply new grout
✅ Wipe and clean
✅ Let it cure
✅ Seal the grout
FAQ: Regrouting Tips
Do I need to remove all the old grout?
Yes, remove at least 1/8 inch so the new grout can adhere properly.
Can I grout over old grout?
No—new grout won’t bond well on top of old material.
What tools work best?
A grout saw is great for small jobs. For bigger areas, an oscillating multitool speeds things up.
How do I get that pro finish?
Take your time applying grout, clean as you go, and don’t skip sealing.
With the right approach, regrouting is a beginner-friendly project that makes a dramatic difference. Your tiles will look fresh, clean, and brand new—all without the mess or expense of replacement.